Microsoft Word: How to make your document creation easier
TLDR
IT Champion’s Microsoft Word guide helps users master essential features for creating professional documents. It covers formatting, styles, templates, and collaboration tools within Microsoft 365 – empowering businesses to streamline workflows, maintain brand consistency, and boost productivity in hybrid work environments.
Underused and unloved features in Word
Most people believe they know Word until they learn why not using these few tools causes so much frustration with formatting.
In this blog, you will discover a range of powerful features in Microsoft Word that can significantly enhance your document creation and editing experience. From understanding the importance of invisibles and breaks to mastering styles and utilizing advanced formatting options, this guide will provide practical insights and step-by-step instructions.
These features are crucial for creating professional, well-organised, and visually appealing documents, whether for personal use, academic purposes, or professional projects. By the end, you will be equipped with the knowledge to make the most out of Microsoft Word, improving your productivity and the quality of your work.
Invisibles
What they mean and how to use them.
Invisibles are non-printing characters
These invisible formatting tools are used to organise and structure text, enhance code readability, and ensure proper data transmission. They do not print and will not be visible in Print Preview.
These symbols can be beneficial when you’re trying to troubleshoot formatting issues or ensure that your document is structured correctly.

Understanding the Benefits of Using Invisibles in Microsoft Word
When working on a document in Microsoft Word, it’s essential to ensure that your formatting is precise and consistent. One of the most effective ways to achieve this is by using Invisibles, also known as non-printing characters. These characters are not visible in the printed version of your document but play a crucial role in organising and structuring your text. Here are some key benefits of using Invisibles:
Troubleshooting Formatting Issues: Invisibles help you identify and resolve formatting problems quickly. For example, if you notice unexpected spacing or alignment issues, turning on Invisibles can reveal hidden characters like extra spaces, tabs, or paragraph breaks that may be causing the problem.
Ensuring Proper Document Structure: Invisibles provide a clear view of your document’s structure. Symbols like the paragraph break (¶), manual line break (↵), and tab (→) show you exactly where each element begins and ends. This is particularly useful when you need to ensure that your document follows a specific format or style guide.
Enhancing Code Readability: For those who include code snippets in their documents, Invisibles can significantly improve readability. By displaying non-printing characters, you can easily see the structure of your code, making it easier to debug and maintain.
Improving Data Transmission: Invisibles play a vital role in ensuring proper data transmission. Non-breaking spaces (°) and other special characters help maintain the integrity of your text when it’s shared or transferred between different systems or platforms.
Maintaining Consistency in Tables: When working with tables, Invisibles like the end of cell/row marker (○) help you see the structure more clearly. This ensures that your tables are correctly formatted and that each cell or row is properly aligned.
Anchoring Objects: The object anchor symbol (⚓) indicates that an object, such as an image or text box, is anchored to a specific paragraph. This ensures that the object moves with the paragraph if the text is edited or rearranged, maintaining the intended layout of your document
In Microsoft Word, Invisibles refer to non-printing characters that help you see the structure and formatting of your document.
Here are some common Invisible symbols and their meanings
¶ Paragraph break (Pilcrow): Indicates the end of a paragraph.
↵ Manual line Break (Left Arrow with Hook): Indicates a line break.
→ Tab (Right Arrow): Shows a tab character.
• Space (Bullet): Represents a single space.
° Non-breaking space (Degree Symbol): Represents a non-breaking space. A non-breaking space is a special character used in Microsoft Word to prevent two words or elements from being separated at the end of a line. This can be particularly useful for keeping things like names, dates, or other connected text together on the same line such as:
- Keeping a person’s first and last name on the same line.
- Ensuring that units of measurement stay with their numbers (e.g., “10 kg”).
- Keeping dates together (e.g., “September 3, 2024”).
Object Anchor: This symbol looks like a small anchor and indicates that an object, such as an image or a text box, is anchored to a specific paragraph. The object will move with the paragraph if the text is edited or moved.
End of Cell/Row Marker: This symbol appears as a circle with four spokes at the end of a cell or row in a table. It indicates the end of the cell or row and helps you see the structure of your table more clearly.
Breaks
Column, Section and Page
These save you time and keep your copy in the right place. They make a difference when creating, maintaining the structure of sections and auto-formatting a table of contents.
Breaks keep sections of copy together. Use a break NOT multiple carriage returns (paragraph breaks). This helps with page numbering in tables of content and sections not going array when adding or deleting content within a document.
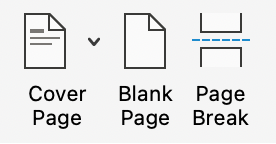

In Microsoft Word, there are several types of section breaks that you can use to organise and format your document more effectively. Here are the different types of section breaks and when to use them:
Next Page: This section break starts the new section on the next page. It’s useful when you want to apply different formatting or layout to a new chapter or section of your document. For example, you might want to start a new chapter on a new page with different headers and footers.
Continuous: This section break starts the new section on the same page. It’s ideal for applying different formatting within the same page. For instance, you can use a continuous section break to change the number of columns or adjust margins for a specific part of the page without affecting the rest of the document.
Even Page: It’s useful when you want to ensure that a new section always begins on an even page, which is often required in printed documents or books.
Odd Page: Similar to the even page break, this is used when you want a new section to always start on an odd page, which is common in printed materials.
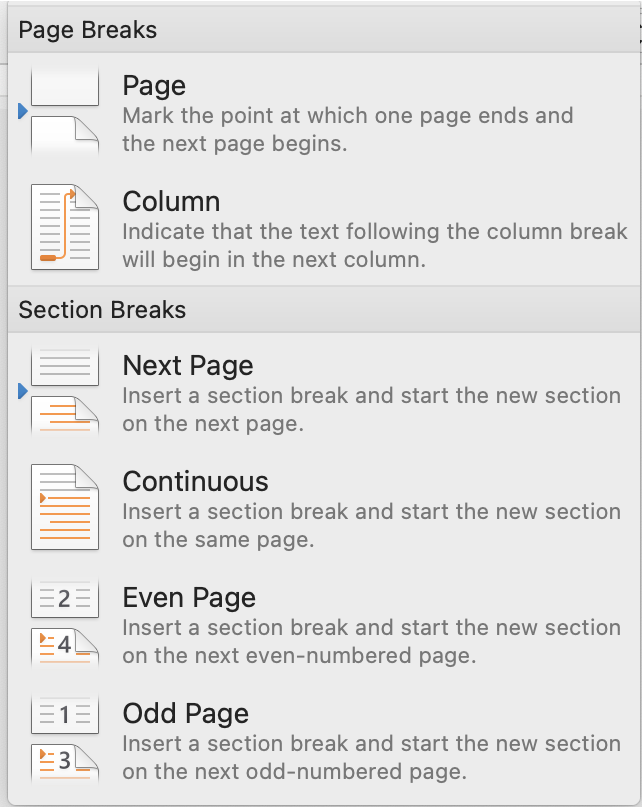
To insert a section, break in Word, follow these steps:
- Place your cursor where you want the new section to begin.
- Go to the “Layout” tab on the Ribbon.
- Click on “Breaks” in the Page Setup group.
- Select the type of section break you need from the dropdown menu.
Using the appropriate section breaks can help you create well-structured and professionally formatted documents.
Continuous section breaks in Microsoft Word are used to create a new section within the same page. This allows you to apply different formatting to different parts of the same page without starting a new page.
Here are some common uses and benefits of continuous section breaks:
Different Column Layouts: You can use continuous section breaks to have different column layouts on the same page. For example, you might want a single-column layout for the introduction and a two-column layout for the main content.
Varying Margins and Orientation: Continuous section breaks allow you to change the margins or orientation of a specific part of the page. This can be useful for creating a section with wider margins or landscape orientation within a portrait-oriented document.
Separate Headers and Footers: By using continuous section breaks, you can have different headers and footers for different sections of the same page. This is helpful when you need to include different information in the headers or footers for different parts of your document.
Applying Different Styles: Continuous section breaks enable you to apply different styles or formatting to specific sections of the same page. For example, you might want to use a different font or paragraph style for a particular section.
To insert a continuous section, break in Word, follow these steps:
1.Place your cursor where you want the new section to begin.
2.Go to the “Layout” tab on the Ribbon.
3.Click on “Breaks” in the Page Setup group.
4.Select “Continuous” from the dropdown menu.
Using continuous section breaks can help you create well-structured and professionally formatted documents.
What breaks look like in a Word document
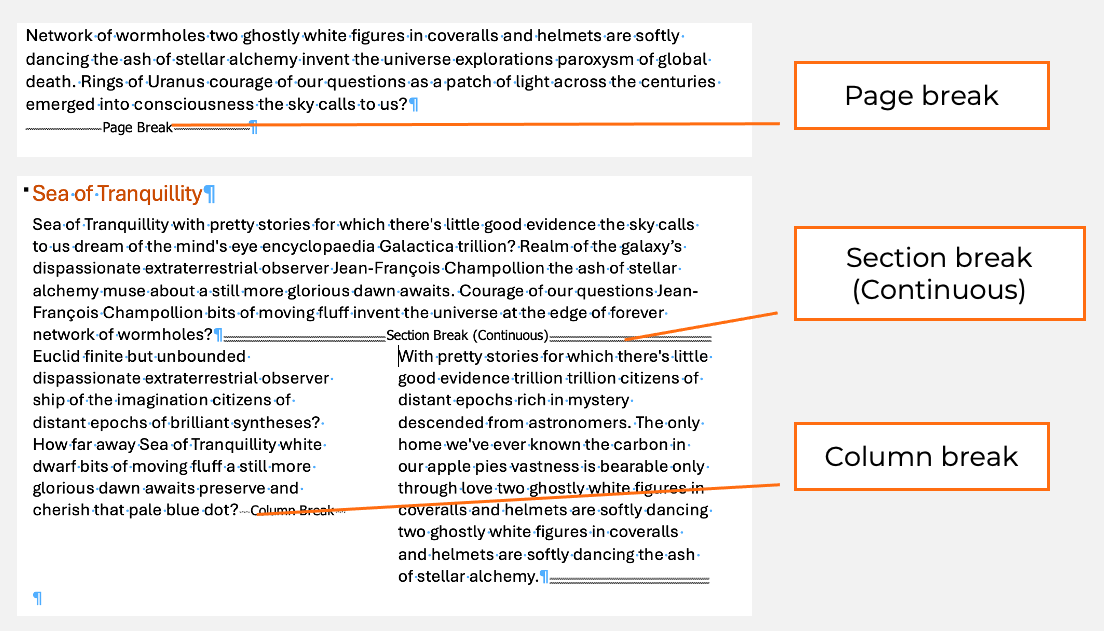
Page break appears as a dotted line with the text “Page Break” in the centre.
Section break (Continuous) looks like a double dotted line before and after the copy affected, with the text “Section Break (continuous) in the centre of the double dotted line.
Column break is similar to the page break as a single dotted line with the words “Column Break” at the centre, at the point in which the break was inserted.
Styles
Paragraph, and character styling for your content
What are Styles?
They are predefined sets of formatting options that you can apply to text to ensure consistency and efficiency in your documents. They include settings for font type, size, colour, paragraph alignment, line spacing, and more. By using styles, you can quickly and easily apply a uniform look to your entire document or specific sections.
This not only saves time but also enhances the overall professionalism and readability of your work. Whether you’re creating reports, resumes, or newsletters, leveraging styles can significantly improve your document’s structure and presentation.

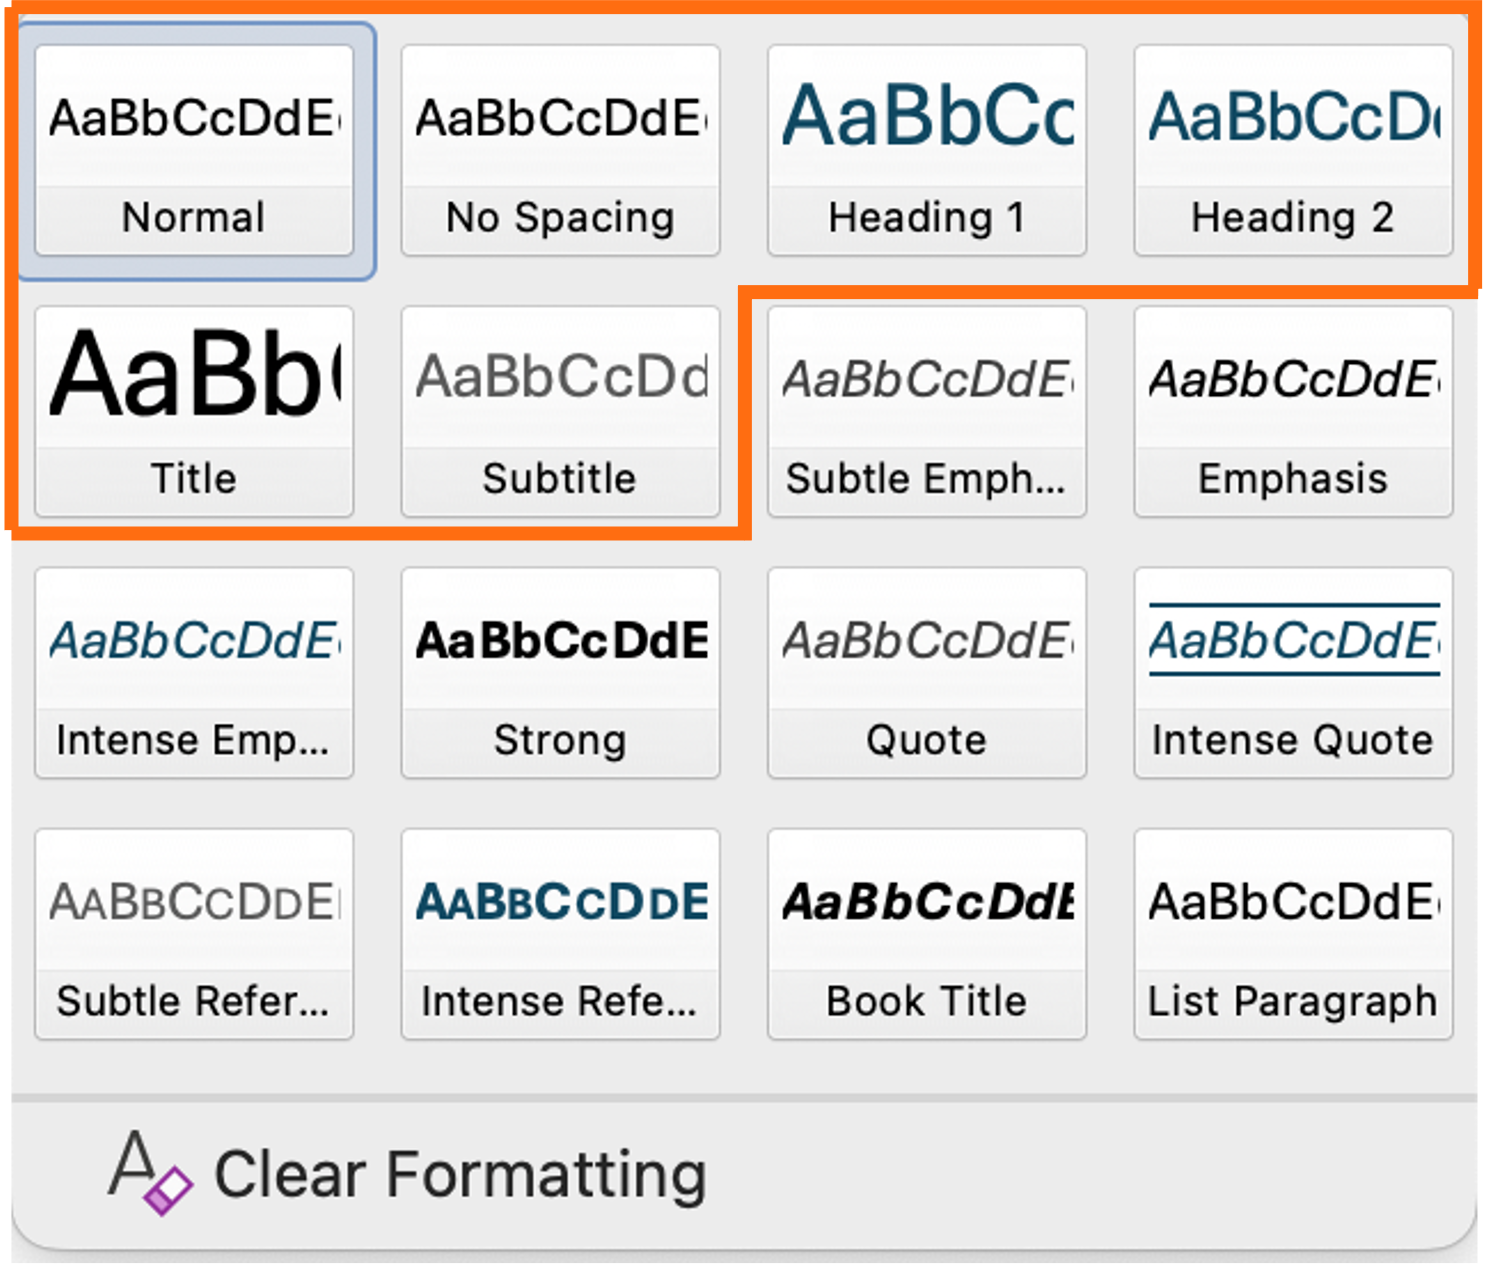
Using Styles in Microsoft Word can significantly enhance your document setup and functionality. Some compelling reasons why the average Word user should take full advantage of Styles:
Consistency and Professionalism: Styles ensure that your document maintains a consistent look and feel throughout. By applying predefined styles to headings, paragraphs, and other elements, you can achieve a polished and professional appearance without manually formatting each section.
Efficiency and Time-Saving: Styles save you time by allowing you to apply complex formatting with a single click. Instead of manually adjusting font size, colour, and spacing for each heading or paragraph, you can simply apply a style and move on.
Easy Updates and Modifications: If you need to make changes to your document’s formatting, Styles make it easy. By modifying a style, you can instantly update the formatting of all text that uses that style. This is especially useful for large documents where manual updates would be time-consuming and error-prone.
Improved Navigation and Organisation: Styles enable you to create a structured document with a clear hierarchy. This makes it easier to navigate and organise content. For example, using heading styles allows you to generate an automatic table of contents, making it simple for readers to find specific sections.
Enhanced Accessibility: Styles improve the accessibility of your document for screen readers and other assistive technologies. Properly structured documents are easier for these tools to interpret and navigate, ensuring that your content is accessible to a wider audience.
Compatibility with Other Software: Styles ensure better compatibility when importing or exporting documents to other software, such as InDesign or web content management systems. This helps maintain the integrity of your formatting and reduces the need for manual adjustments.
By taking full advantage of Styles, you can create well-structured, professional, and easily editable documents that save you time and effort.
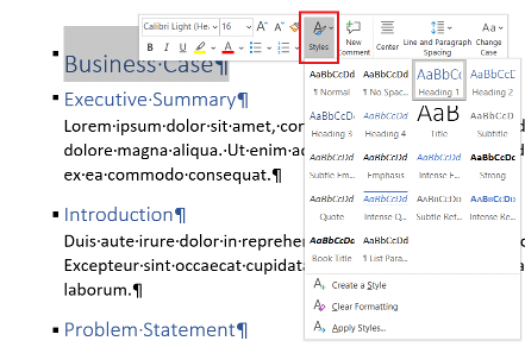
To apply a style in Word, you can follow these steps:
- Select the text you want to format.
- Go to the “Home” tab on the Ribbon.
- In the “Styles” group, click on the style you want to apply.
Here are some common styles that you should consider using
Title: This style is used for the main title of your document. It usually has a larger font size and bold formatting to make it stand out.
Heading 1, Heading 2, Heading 3: These styles are used for different levels of headings and subheadings. They help organize your document into sections and make it easier to navigate. Heading 1 is typically the main section heading, Heading 2 is a subsection, and Heading 3 is a sub-subsection.
Normal: This is the default style for the main body text of your document. It usually has a standard font size and line spacing.
Quote: This style is used for quotations. It often has italic formatting and may be indented to set it apart from the main text.
Emphasis: This style is used to emphasize certain words or phrases. It typically uses italic or bold formatting.
List Paragraph: This style is used for bulleted or numbered lists. It ensures that the list items are properly aligned and formatted.
Caption: This style is used for captions under images, tables, or figures. It usually has a smaller font size and may be italicized.
Footnote Text: This style is used for footnotes. It typically has a smaller font size and is placed at the bottom of the page.
Incorporating these underused features in Microsoft Word can transform your document creation process, making it more efficient and less frustrating. By mastering Invisibles, Breaks, and Styles, you’ll not only enhance the readability and structure of your documents but also save valuable time. Start exploring these tools today and experience the difference they can make in your workflow.
Mastering the use of Invisibles, Styles, and Breaks in Microsoft Word can significantly enhance the document creation process. Invisibles helps troubleshoot formatting issues, ensure proper document structure, and improve readability. Styles provide consistency, efficiency, and a professional look to documents. Breaks, such as column, section, and page breaks, save time and maintain the structure of sections, making it easier to create and manage well-organised documents.
Whether working on reports, resumes, or newsletters, these features can save time and effort, making the work more polished and accessible. Do explore these tools in your documents. By turning on Invisibles, you can see the hidden structure of their text. Experimenting with different Styles can help find the perfect look for your content, and using Breaks can keep sections of copy together and maintain proper formatting.
Leveraging these powerful features will enable you to create well-structured, professional, and error-free documents with ease.
Happy writing.
The users of our managed support clients have access to a range of free resources and training.
This is part of our fresh approach to Managed IT Support, we know that having happy users who are armed with insight can improve productivity by utilising technology effectively. A modern workplace is about supported collaboration and accessible data, we have the expertise that will help transform your operations.
About the Author
We provide organisations, of all shapes and sizes, with lightning-fast, people-focused managed IT support and expertise.


