Create Professional Videos in Microsoft Clipchamp
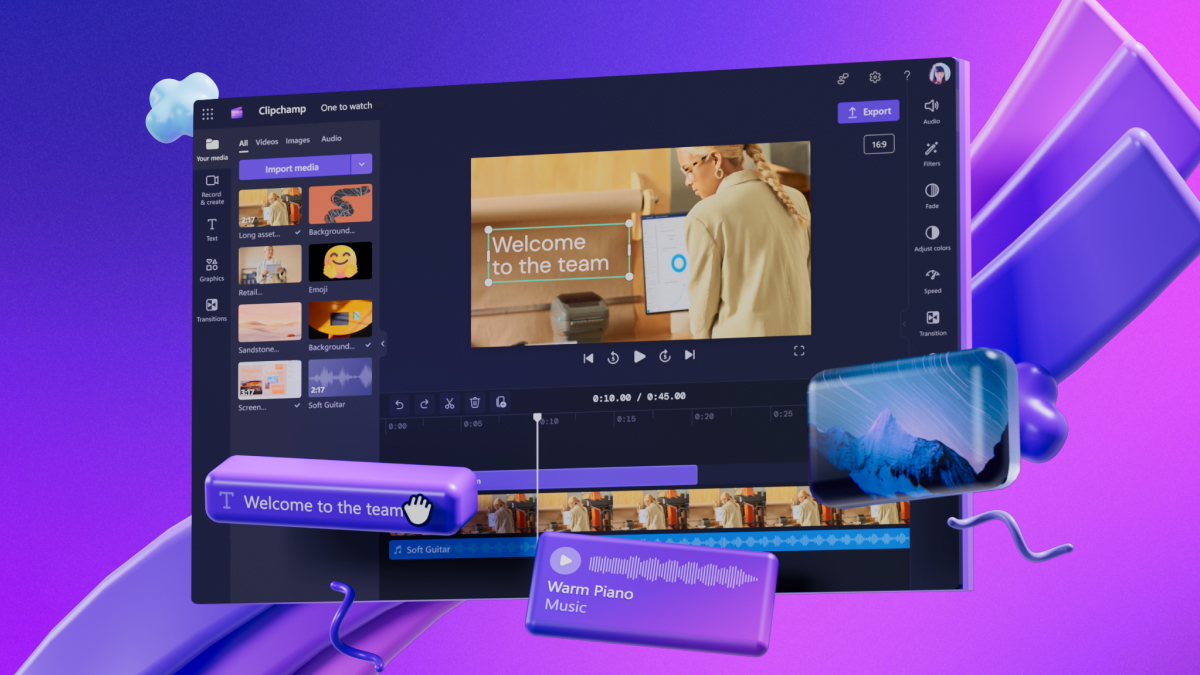
Video has become the currency of modern business communication. Whether you’re updating your team, onboarding new employees, demonstrating a product, or sharing a project update, video delivers your message with clarity and impact that text cannot match.
A widely cited marketing benchmark states that viewers can retain 95% of information when delivered via video compared to just 10% when reading text (Insivia 2025. Video Marketing Statistics You Must Know In 2025). Many Microsoft 365 users can overlook a powerful tool included in their subscription: Microsoft Clipchamp.
If you’re new to video editing or intimidated by complicated software, Clipchamp changes the game. This cloud-based video editor is specifically designed for business users who need professional results without a steep learning curve or expensive software licenses.
In this guide, you’ll discover:
- What Clipchamp is and how it integrates with your Microsoft 365 environment
- Why it’s ideal for business communications, training, and marketing
- A complete walkthrough of the interface and essential features
- Practical tips for planning, editing, and exporting your first video
- Best practices to ensure your videos look polished and professional
By the end of this article, you’ll have the knowledge and confidence to create your first business video in Clipchamp, with no prior editing experience required.
What Is Microsoft Clipchamp?
Microsoft Clipchamp is a browser-based video editing platform that Microsoft acquired in 2021 and has since integrated into the Microsoft 365 ecosystem. Unlike traditional desktop editing software that requires downloads, installations, and powerful hardware, Clipchamp runs entirely in your web browser, making it accessible from any device with an internet connection.
For Microsoft 365 users, Clipchamp represents a significant advantage: professional video creation capability without additional software costs or training overhead.
Who Is Clipchamp For?
Clipchamp is specifically designed for:
- Beginners who’ve never edited video before
- Business users who need quick, professional results
- Internal communications teams creating employee updates and announcements
- Marketers producing social media content
- Trainers and educators building instructional videos
- Small business owners who can’t justify expensive editing software
What Makes Clipchamp Different?
Unlike professional editing suites such as Adobe Premiere Pro or Final Cut Pro, Clipchamp prioritises accessibility over complexity:
Intuitive drag-and-drop interface – No need to learn complicated workflows or keyboard shortcuts. If you can use PowerPoint, you can use Clipchamp.
Pre-built templates – Start with professionally designed templates for common business scenarios, then customise with your content and branding.
Cloud-based editing – Access your projects from anywhere, collaborate with colleagues, and seamlessly integrate with OneDrive and SharePoint.
Built-in stock library – Access millions of royalty-free stock videos, images, and audio tracks without leaving the platform or purchasing additional licenses.
Microsoft 365 integration – Sign in with your work account, use your organisation’s fonts and colours, and export directly to SharePoint or Teams.
Why Use Clipchamp for Business Videos?
Video editing might seem like the domain of marketing agencies and creative professionals, but Clipchamp democratises video creation for everyday business scenarios.
Real-World Business Use Cases
Internal Communication
- CEO messages and company announcements
- Team updates and project status reports
- Virtual town halls and all-hands meetings
- Recognition videos celebrating employee achievements
Training and Development
- New employee onboarding videos
- Software tutorials and how-to guides
- Safety and compliance training
- Process documentation and standard operating procedures
Marketing and Social Media
- Product demonstrations and feature highlights
- Customer testimonials and case studies
- Event promotions and recaps
- LinkedIn, Instagram, and Facebook content
Sales Enablement
- Personalised video proposals
- Follow-up messages after meetings
- Product walkthroughs for prospects
- Explainer videos addressing common objections
Remote and Hybrid Work
- Asynchronous team updates that work across time zones
- Recording presentations for colleagues who couldn’t attend live
- Creating shareable resources for distributed teams
The Business Benefits
Time efficiency – Templates and drag-and-drop editing mean you can create a 2-minute video in under 30 minutes.
Cost savings – No need for external agencies or expensive software licenses when you already have access through M365.
Consistency – Use brand kits to ensure every video maintains your visual identity and professional standards.
Accessibility – Add captions automatically to ensure your content is inclusive and viewable in sound-off environments.
Analytics integration – When shared via SharePoint or Stream, track who’s watched your videos and measure engagement.
In today’s digital workplace, the ability to create compelling video content is no longer optional—it’s a core communication competency. Clipchamp makes this accessible to everyone in your organisation.
Getting Started: A Tour of the Clipchamp Interface
When you first launch Clipchamp, you’ll see a clean, uncluttered workspace designed to get you creating quickly. Let’s walk through the key areas you’ll use in every project.
Navigation Tips for Beginners
Use keyboard shortcuts – Even as a beginner, learning spacebar (play/pause) and arrow keys (move frame by frame) will speed up your workflow significantly.
Snap to grid – Keep this enabled (it’s on by default) to ensure clips align precisely in your timeline without gaps.
Preview frequently – Don’t wait until the end to watch your video. Preview after each edit to catch issues early.
The Home Screen
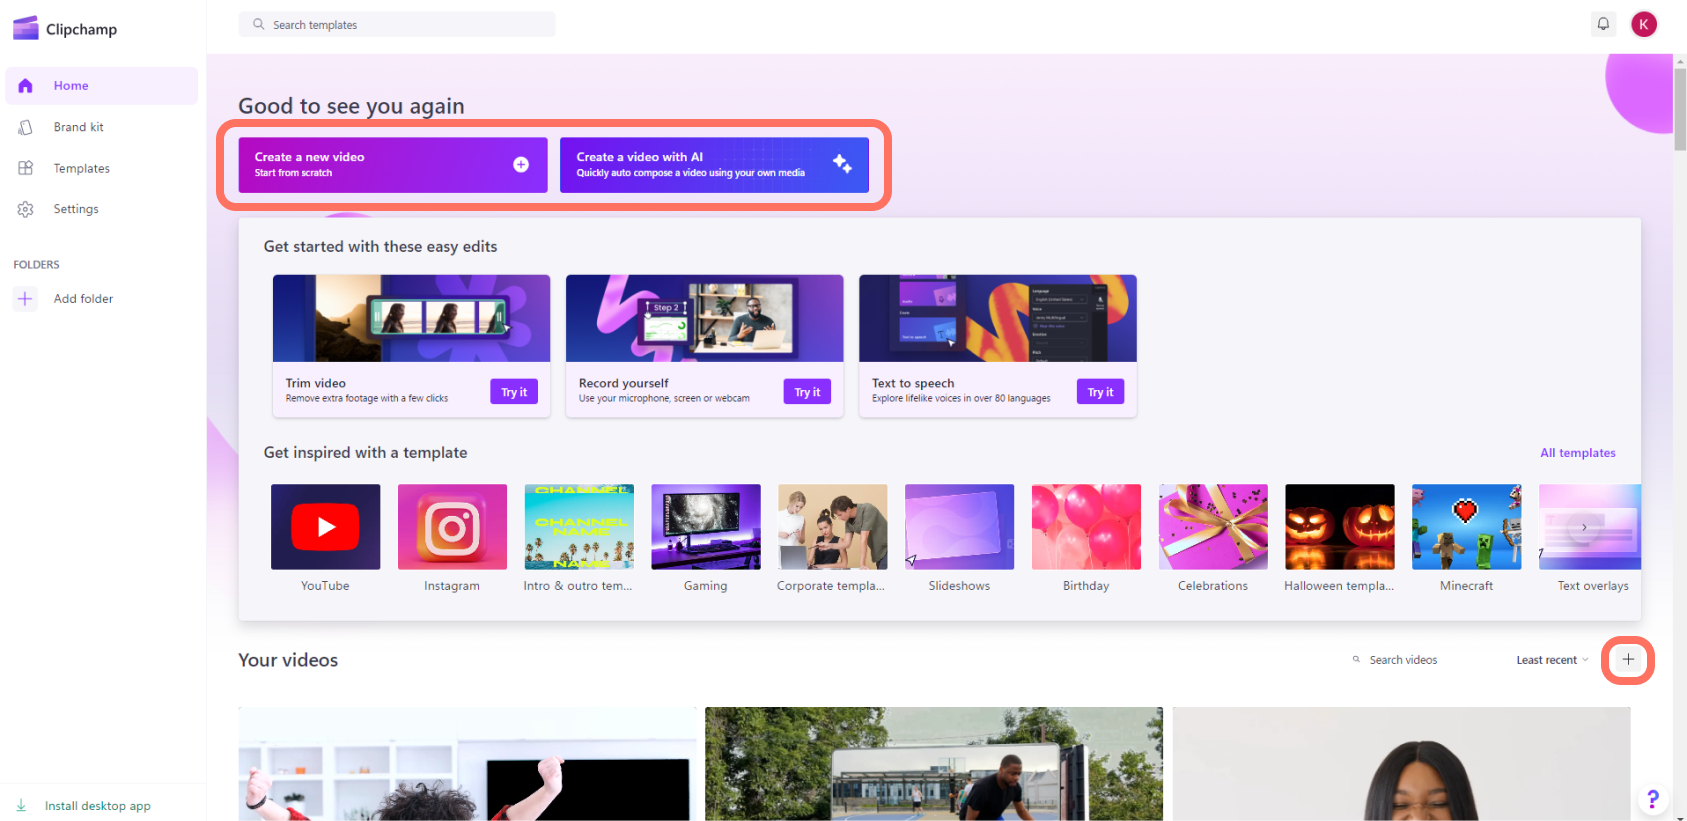
After signing in, you’ll land on the Clipchamp home screen, which displays:
Templates library – Dozens of pre-designed templates organised by category (social media, presentations, marketing, tutorials, etc.)
Recent projects – Quick access to videos you’ve been working on
Blank project – Start from scratch with a completely customisable canvas
Pro tip: Even if you’re creating something specific, browse the templates first. You can customise any template completely, and starting with a professional structure often produces better results than building from scratch.
The Video Editor Workspace
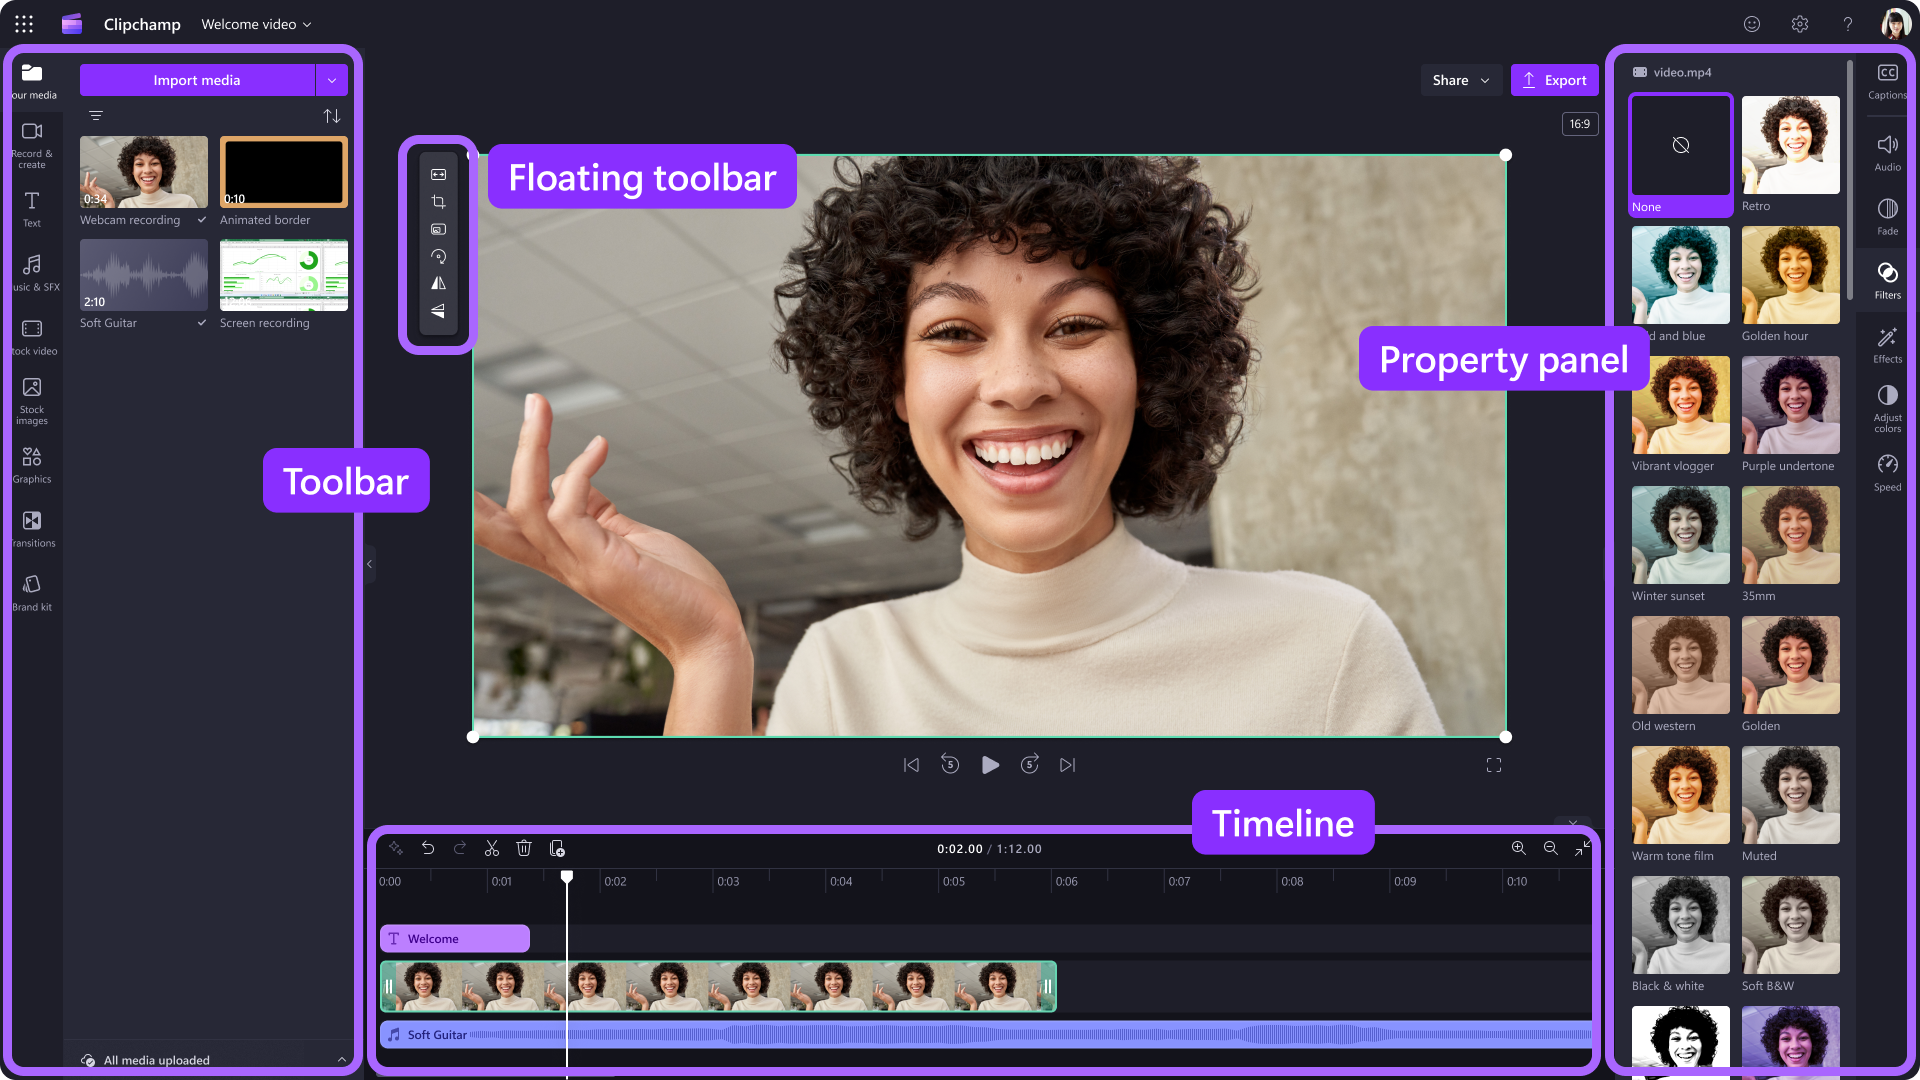
The Clipchamp interface is designed to feel familiar to anyone who’s used PowerPoint or other Microsoft applications. You don’t need to memorise every feature on day one—start with the basics and explore advanced options as your confidence grows.
Once you create or open a project, you’ll see the main editing interface, which consists of five key areas:
Toolbar (Left Sidebar)
This is your content library, organised into tabs:
Your media – Upload your own video clips, images, and audio files by dragging them directly into this area or clicking the upload button.
Stock library – Access millions of royalty-free assets:
- Video clips filtered by category, mood, and style
- Images and graphics
- Music tracks and sound effects
- All included with your Microsoft 365 subscription
Text – pre-formatted title templates, lower thirds, and text overlays you can customise with your messaging.
Brand kit – Store your organisation’s logos, colours, and fonts for consistent branding across all videos.
Transitions – Visual effects that smooth the change between clips (fades, wipes, dissolves, etc.)
Filters – One-click colour grading options to give your video a specific mood or aesthetic.
Timeline (Bottom)
The timeline is where you’ll do most of your editing work:
Multiple tracks – Layer video, images, text, and audio on separate tracks for complex compositions
Clip manipulation – Drag clips to reorder them, trim ends by dragging edges, or split clips at specific points
Zoom slider – View your entire project or zoom in for frame-accurate editing
Playhead – The vertical line showing your current position in the timeline
Pro tip: Right-click any clip in the timeline to access quick options like duplicate, delete, detach audio, or adjust speed.
Preview Window (Centre)
The large preview area shows exactly what your video will look like when exported.
Key features include:
Playback controls – Play, pause, and scrub through your video to preview edits
Zoom controls – Adjust the preview size to see fine details or get an overview
Safe zones – Optional guides showing where text will be visible on different platforms
Properties Panel (Right Sidebar)
When you select any element in your timeline, the properties panel displays relevant editing options:
For video clips:
- Adjust colour, brightness, contrast, and saturation
- Apply filters and effects
- Control opacity and blending modes
- Crop or rotate footage
For text:
- Change font, size, colour, and alignment
- Add animations (fade in, slide in, etc.)
- Adjust positioning and layering
For audio:
- Adjust volume levels
- Fade audio in or out
- Apply the auto-adjust feature to balance levels automatically
Top Toolbar
Essential project-level controls:
Export button – Render your finished video (we’ll cover export settings in detail later)
Undo/Redo – Reverse mistakes or reapply changes
Project name – Click to rename your project for easier organisation
Saving – Your work saves automatically to the cloud, so you’ll never lose progress
Plan Before You Edit: Storyboarding Made Simple
The biggest mistake new video creators make is jumping straight into editing without a plan. Professional video producers know that planning, specifically storyboarding, saves hours of editing time and results in more focused, effective videos.
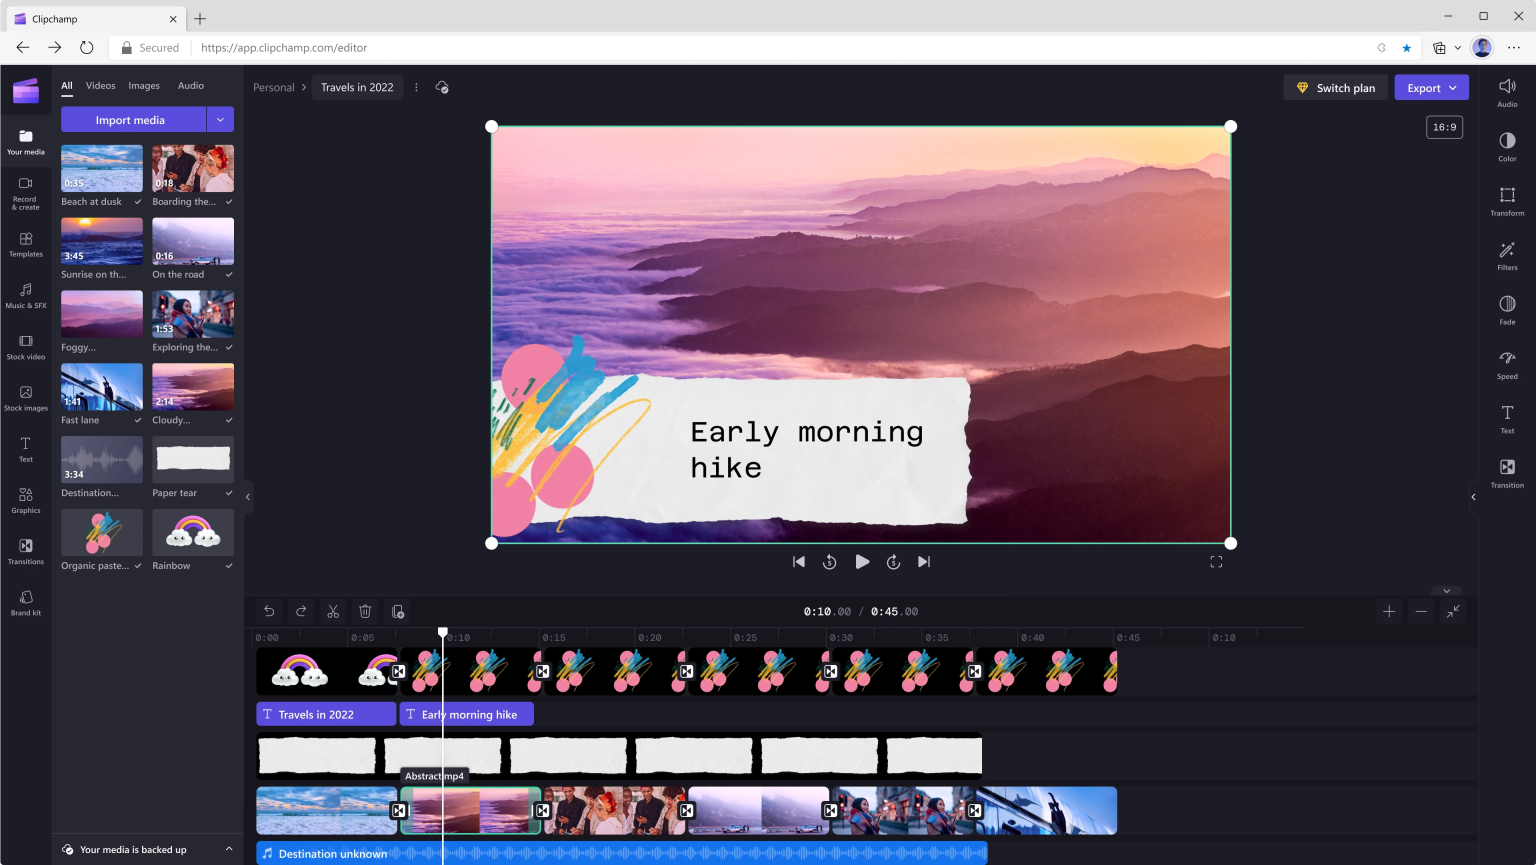
Why Storyboarding Matters
Clarity of message – Writing out your video scene by scene forces you to articulate exactly what you’re communicating and in what order.
Efficient editing – When you know precisely what footage you need, you avoid shooting or sourcing unnecessary content and spending hours editing material you’ll never use.
Logical flow – Storyboarding reveals gaps in your narrative or awkward transitions before you’ve invested time in editing.
Team alignment – If you’re working with colleagues, a storyboard ensures everyone understands the vision before production begins.
Reduced anxiety – Knowing you have a roadmap dramatically reduces the overwhelm of starting a video project.
Simple Storyboarding for Business Videos
You don’t need artistic skills or complicated software to storyboard effectively. A simple table format works perfectly for videos:
| Scene | Visual | Audio/Voiceover | Duration | Notes |
|---|---|---|---|---|
| 1. Opening | Company logo animation | Upbeat music (no voice) | 3 sec | Use brand colours |
| 2. Problem statement | Stock footage: frustrated person at computer | “Are your team updates getting lost in email?” | 5 sec | Relatable scenario |
| 3. Solution intro | Transition to Clipchamp interface | “There’s a better way to communicate…” | 4 sec | Screen recording |
| 4. Feature demo | Screen recording: creating video in Clipchamp | “With Clipchamp, you can create professional videos in minutes…” | 15 sec | Show drag-and-drop ease |
| 5. Benefit statement | Stock footage: team watching video together, smiling | “Your team will actually watch and retain your message.” | 5 sec | Positive emotion |
| 6. Call to action | Text overlay: “Start creating today” + logo | “Try Clipchamp now, it’s included with your Microsoft 365 subscription.” | 5 sec | Clear next step |
Storyboard Template Questions
For each scene in your video, answer these questions:
- What is the viewer seeing? (Screen recording, talking head, stock footage, text overlay, product demo, etc.)
- What is the viewer hearing? (Voiceover script, music, ambient sound, silence)
- How long will this scene last? (Approximate timing in seconds—you’ll refine this during editing)
- What is the purpose of this scene? (Grab attention, establish problem, present solution, demonstrate feature, build credibility, inspire action)
- What emotion should this scene evoke? (Curiosity, frustration, relief, excitement, confidence, urgency)
Five minutes of planning with a storyboard will save you hours of editing and ensure your final video is focused, professional, and achieves its intended purpose.
Exporting Your Video for Social Media, Presentations, or Internal Use
You’ve edited your video, added music, refined your message, and previewed it dozens of times. Now comes the final step: exporting. Choosing the right export settings ensures your video looks professional wherever it’s viewed.
Understanding Export Settings
When you click the Export button in Clipchamp, you’ll see several options. Here’s what each setting means and when to use it:
Resolution (Video Quality)
1080p (1920×1080) – Full HD quality, recommended for most business uses
- Professional presentations
- LinkedIn and YouTube content
- Training videos
- Webinar recordings
- File size: Moderate to large
720p (1280×720) – HD quality, good for smaller screens or file size constraints
- Internal communications where file size matters
- Email attachments (though linking is preferable)
- Quick social media updates
- File size: Moderate
480p (854×480) – Standard definition, use only when necessary
- Situations with strict file size limits
- Recipients with slow internet connections
- File size: Small
4K (3840×2160) – Ultra HD quality, rarely necessary for business videos
- Only if your source footage is 4K and your audience has displays and bandwidth to support it
- File size: Very large
Recommendation: Stick with 1080p for nearly all business applications. It’s the sweet spot between quality and file size.
Aspect Ratio
The aspect ratio determines your video’s shape. Choose based on where the video will be viewed:

16:9 (Widescreen) – Standard for:
- YouTube
- LinkedIn posts
- Webinar recordings
- PowerPoint presentations
- Microsoft Teams viewing
- Most professional contexts
9:16 (Vertical) – Required for:
- Instagram Stories and Reels
- TikTok
- Mobile-first viewing
- Tip: Plan vertical videos differently—tight framing and text placement are critical
1:1 (Square) – Best for:
- Instagram feed posts
- Facebook feed
- LinkedIn feed (performs well in mobile scrolling)
- Benefit: Takes up maximum screen real estate in social feeds
4:5 (Vertical Rectangle) – Optimised for:
- Instagram feed (takes more vertical space than 1:1)
- Facebook feed
Pro tip: If you’re unsure where your video will ultimately be shared, create your master version in 16:9 at 1080p, then export additional versions in other aspect ratios as needed. Clipchamp allows you to duplicate projects and change dimensions without re-editing.
Compression and Format
Clipchamp exports videos as MP4 files using H.264 compression—the industry standard that works across virtually all platforms and devices. You typically won’t need to adjust these settings.
Platform-Specific Export Recommendations
For Microsoft Teams
- Resolution: 1080p
- Aspect ratio: 16:9
- Duration: Under 5 minutes for attention retention
- File size: Teams supports up to 250MB per file
- Tip: Upload to SharePoint or OneDrive and share the link in Teams rather than attaching the file directly
For LinkedIn
- Resolution: 1080p
- Aspect ratio: 16:9 or 1:1 (square performs better in feed)
- Duration: 30 seconds to 3 minutes ideal
- Captions: Always include—85% of LinkedIn video is watched without sound
- Tip: Native uploads (not YouTube links) receive better algorithmic distribution
For PowerPoint Presentations
- Resolution: 1080p
- Aspect ratio: 16:9 (matches standard slide dimensions)
- Format: MP4 (most compatible with all PowerPoint versions)
- Tip: Insert via Insert > Video > This Device, then set to play automatically or on click depending on your presentation flow
For Email
- Don’t attach directly – Video files are too large for email and often get blocked
- Instead: Export at 1080p, upload to SharePoint or OneDrive, then share the link with appropriate permissions
- Alternative: Upload to Microsoft Stream or Vimeo and embed a clickable thumbnail in your email
For Instagram
- Feed posts:
- Aspect ratio: 1:1 or 4:5
- Resolution: 1080p
- Duration: Up to 60 seconds
- Stories:
- Aspect ratio: 9:16 (vertical)
- Resolution: 1080p
- Duration: Up to 60 seconds
- Reels:
- Aspect ratio: 9:16
- Resolution: 1080p
- Duration: 15-90 seconds
For YouTube
- Resolution: 1080p minimum (4K if source footage supports it)
- Aspect ratio: 16:9
- Format: MP4
- Captions: Upload a separate SRT file for better accessibility and SEO
Export Process in Clipchamp
Once you’ve chosen your settings:
- Click Export in the top-right corner
- Select your resolution (1080p recommended)
- Wait for Clipchamp to render your video (timing varies based on length and complexity)
- Download the file to your computer
- Upload to your intended platform or save to OneDrive/SharePoint
Pro tip: Clipchamp saves an export history. If you need to re-download a previously exported version, you can access it without re-rendering.
Managing File Size
Larger files mean longer export times, slower uploads, and potential playback issues for viewers with limited bandwidth. Here’s how to optimise:
Reduce resolution – Dropping from 1080p to 720p roughly halves file size with acceptable quality loss for many applications.
Shorten duration – The single biggest factor in file size is video length. A focused 90-second video is almost always more effective than a rambling 5-minute one.
Avoid excessive effects – Multiple layers, complex transitions, and heavy colour grading increase file size. Keep editing clean and simple.
Compress after export – If you need an even smaller file, use a free tool like HandBrake to further compress your exported video (though this adds an extra step).
Before You Share: The Quality Check
Always preview your exported video before publishing:
Watch on the target device – If it’s for mobile viewing, watch it on your phone. If it’s for a presentation, view it on a large screen.
Check audio levels – Ensure music isn’t overpowering voiceover and that dialogue is clear.
Verify captions – If you’ve added subtitles, confirm they’re timed correctly and free of errors.
Test links and CTAs – If your video includes calls to action or clickable elements, verify they work as intended.
Get a second opinion – Have a colleague watch before you share widely. Fresh eyes catch issues you might miss after hours of editing.
Taking an extra five minutes for a quality check can save you the embarrassment of discovering errors after hundreds of people have viewed your video.
Finally
Video is no longer a luxury or the exclusive domain of marketing departments—it’s an essential communication tool for modern organisations. Whether you’re updating your team, training new employees, demonstrating products, or sharing your expertise, video delivers your message with clarity, personality, and impact that text alone cannot achieve.
Microsoft Clipchamp makes professional video creation accessible to everyone in your organisation. You don’t need design skills, technical expertise, or expensive software. Everything you need is already included with your Microsoft 365 subscription and accessible from any web browser.
You already have access to Clipchamp with your M365 licence. You already have everything you need to create professional videos that inform, engage, and inspire your audience. The only thing standing between you and your first published video is the decision to start.
Video creation is a skill, and like all skills, it improves with practice. Your first video won’t be perfect—and that’s completely fine. Every professional video creator started exactly where you are now.
The question isn’t whether you can create professional videos. You absolutely can.
The question is: what will you create?
Start creating today. Your message deserves to be seen and heard.
Learn More
Official Clipchamp resources:
- Clipchamp Help Centre: clipchamp.com/en/help
- Microsoft Learn training modules: Learn Video Editing with Clipchamp
- Clipchamp YouTube channel: Video tutorials for specific features
Connect with the community:
- Microsoft 365 Community forums for tips and troubleshooting
- LinkedIn Learning for comprehensive video strategy courses
- Your organisation’s internal champions or Microsoft 365 experts


